First, decide where the second copy should live.
Rec saves recordings on your iPhone. That makes recording straightforward, but it is not the same as keeping a separate backup. If the only copy is on the phone, losing the phone could mean losing the audio too.
With Rec Pro, you can choose a folder in Apple's Files picker for automatic backup. iCloud Drive is one option. Other providers, such as Dropbox, Google Drive, or OneDrive, may appear if they are installed, signed in, and available through Files. Folder access depends on the provider.
A local folder is still local. A backup under On My iPhone is another copy on the same device. For protection against losing that device, use a synced cloud folder or copy the files to another device and verify them there.
Choose your backup folder in Rec.
- Open OnePress Rec and tap the drive-shaped backup button in the top-right corner.
- If you are using the free app, the Backup screen offers Unlock Pro. Automatic folder backup needs Pro; manual export does not.
- Tap Choose Backup Folder. If a folder is already selected, the button is called Change Backup Folder.
- In the Files picker, select the location and folder you want Rec to use. A dedicated folder named OnePress Rec makes it easier to find later.
- Confirm the folder selection and return to Rec. Check the backup status at the top of the screen.
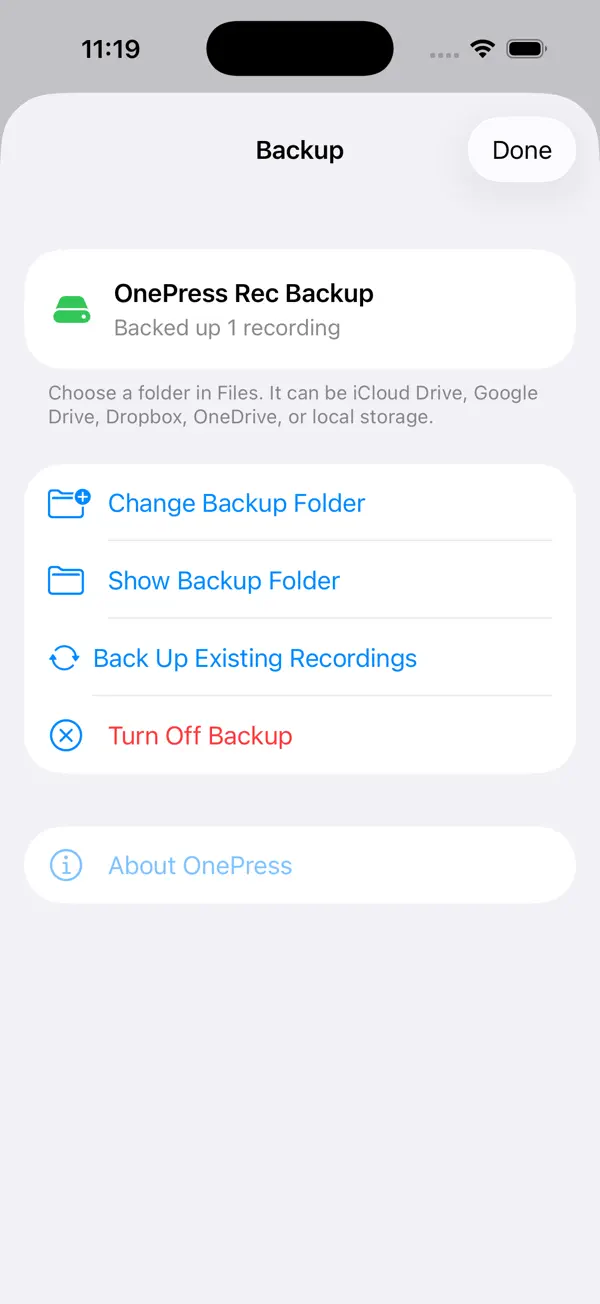
Copy existing recordings, then check one.
After choosing a folder, tap Back Up Existing Recordings to copy recordings already saved in Rec. Wait for the operation to finish and read the status. New recordings can then be backed up automatically while backup is enabled.
Tap Show Backup Folder, or open the same folder in Files. Find a recording you recognize and play the copied audio. In version 1.1, backups can also include a recording-details text file and a transcript text file when a transcript is available.
If you selected a cloud folder, allow that provider to finish uploading. Open the folder on another device or in the provider's website to confirm the copy arrived. Seeing a file on the iPhone alone does not prove it has synced elsewhere.
Only need to save one file? Use manual export.
You do not need Pro to share your audio manually. Open a recording's details, choose Share Audio, then choose Save to Files in the iOS share sheet. Select a folder and save.
This is useful for sending an interview to a colleague or keeping an occasional second copy. It is a manual step for each recording, not automatic backup. Check the exported file before deleting the original.
If a file or folder is missing.
- Check the selected location. A similarly named folder in iCloud Drive is not the same as one under On My iPhone.
- Read Rec's backup status. If the folder is unavailable, reselect it. A storage provider may need you to sign in again.
- Check free space and cloud sync. A full device, full cloud account, or offline provider can prevent a copy from reaching its destination.
- Retry existing backup. Use Back Up Existing Recordings after fixing the folder or connection, then check the file again.
Keep the original audio until you have verified a usable copy. If the problem continues, contact support with your Rec version, iPhone model, storage provider, and the status message. There is no need to send private recordings to report a backup problem.